I made this wall hanging for two reasons. One, Studio Arts Quilters Association was having a themed exhibit called Color Wheel of Emotions and, second, when I teach color I always talk about limiting the use of yellow in it's true hue because it will overpower other colors. So I was thinking if all the colors of the quilt were yellow then they would complement and not compete with each other. I have made this pattern three times before and love it so I used it again!! I have 25 VALUES of yellow and positioned them so the lighter ones are where the face applique will lay and the rest of the yellows fade to the darker shades toward the left side of the picture. I embellished the quilt with yellow and gold rhinestones in the background, gold beads and a yellow felt button for the necklace, a silk flower in the hair, gold glitter on the lips and bead work on the cheek in the shape of a sun. I machine quilted sun motifs on the face as well. I am a sunlight person and I love certain songs with sun or sunny in the name. This quilt did not make the cut for the SAQA exhibit-there were over 260 entries and only 19 were chosen. I don't really care because I love my little sunshine quilt and I can also use it for my "Color Is Our Friend" class/lectures and for my design classes as an example of a monochromatic color scheme.
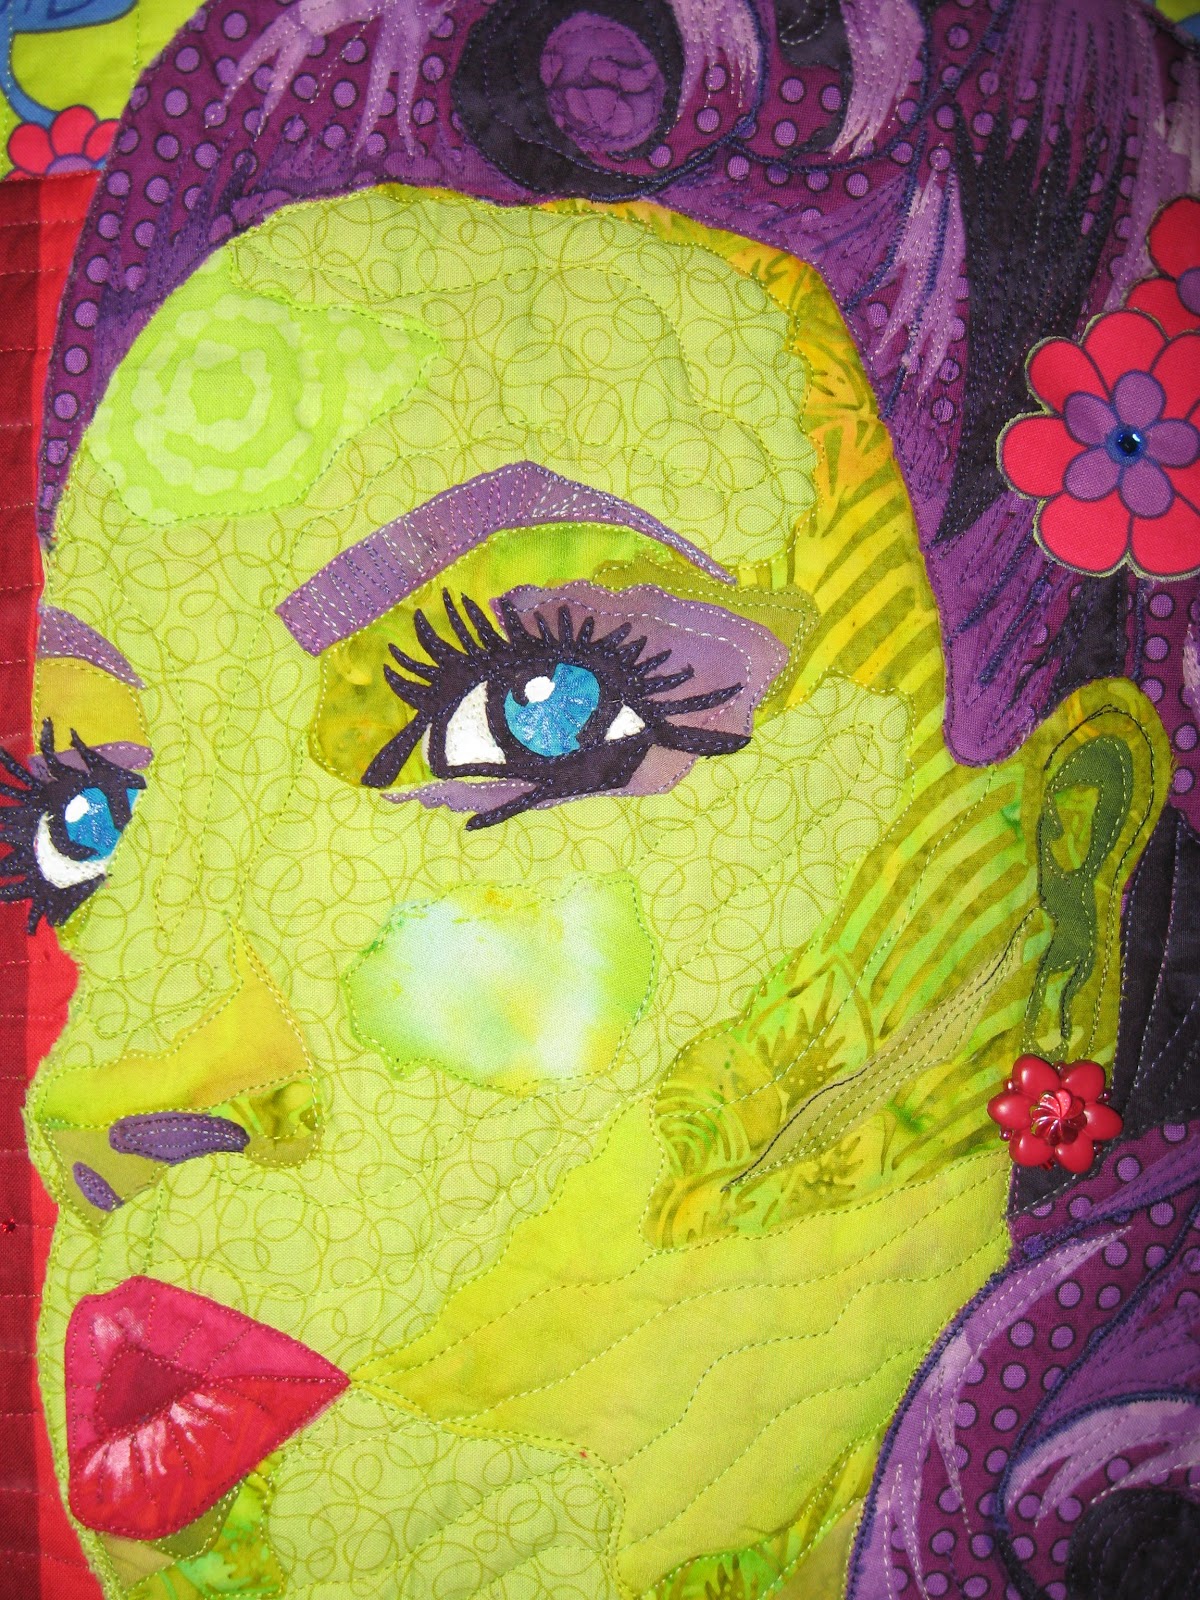
This photo is a close up of the face. I found this great batik for the hazel eye color-it looks like a real iris! The fabrics make me smile because they are so happy!! I chose to use brown as my applique color instead of my usual black because I thought it seemed softer than black but still provided contrast to the yellows.
Fiber artist, Laurie Ceesay, sharing her thoughts and journey to creating art quilts with the emphasis on portraits, hairstyles and fashion.
Sunday, June 9, 2013
Thursday, April 25, 2013
Payback Quilt and Gratitude!!
I love Tina Turner and there is a Facebook page about getting Tina into the Rock and Roll Hall of Fame. (Her and her creepy ex-husband, Ike, are in the Hall of Fame recently.) So on the FB page they are always posting anything new and relevant about her life. Tina was on the cover of the German Vogue magazine. I commented that "I would love to get my hands on this!" About three weeks later a package arrived at the salon I work at and there was the German Vogue from my FB friend!! I was in shock that she even saw the post and then took the time to get me this magazine. She said she has a friend in England who bought it and shipped it to her in North Carolina. (Ilive in Upper Michigan.)
So as a sign of gratitude I made her this cute little quilt sized at 12" x 12" based on one of my patterns. I knew my FB friend had straight brown hair, loves tie dye stuff and peace signs so I incorporated these things in the quilt. It was fun to make and I mailed it out to her a week later!! She loved it and I feel good she has it and I can think of her kindness every time I look at the pictures in the German Vogue-I don't know German so I can't actually read the Tina Turner acticle!!
Sunday, April 21, 2013
2013 Sacred Threads Quilt Exhibit Acceptance
The colors I have chosen for each side of the Bipolar Disorder is also representational. The clothing, the hair, the jewelry etc. all reflect this.
Sunday, April 7, 2013
Simply Summer
Pine Street Quilts, where I work part-time, got in new charm packs from Moda called "Simple Marks" by Malka Dubrasky. She had a previous line last year and I loved it! The bright cheery colors and the bold geometrics intrigued me and this new line was just as awesome-plus there were polka dots in the collection!! I decided to use AGAIN the "Oh Sew Charming" pattern for the third (and last) time but I also included the beautiful floral instead of just using the charm squares. I found the colorful floral with the white background at the Appleton WI Hobby Lobby and thought it went nicely with these colors in the charm squares. I am also embracing the Modern Quilt Movement and I see a lot of white instead of black with bright colors in the quilts of this movement. I fussy cut four center block pieces as best I could to have the four color "families" represented and also used the floral on the outside corner blocks, the binding and the back. I chose a white with turquiose dot for the background fabric and a variegated thread with turguiose, lime green and a bit of yellow for the quilting. I though it stood alone without any embellishments and it was looking like tropical fruits or fruity Lifesaver wrappers. I call it "Simply Summer" because of the Simple Mark charm pack name and the feeling of summer's bright colors. This is my favorite of the three charm pack patterns because the bright bold colors are my favorites and I love the bold geometric African-like designs plus the great contrast with the white backgorund. It is a happy quilt!!
Wednesday, March 27, 2013
Check Out The New Book-My Quilt Is On Page 107!!
Tuesday, March 26, 2013
Vintage Kitschen
This is my second version using the "Oh Sew Charming!" pattern and a charm pack. I used a Moda Vintage Modern charm pack in this quilt. I chose a cream with grey dot background fabric and arranged the design in color families of red, green, pink and turquose. I used a flower stitch on my Viking Sapphire sewing machine as part of the quilting design to incorporate the outside borders into the design. I "shadow" quilted near this stitching to fill in the border areas. I had a hard time matching any pink embellishments with the peachy old fashioned pink in this quilt-the pinks I chose all appeared very cool toned and I quit and decided to go without an. I love this line of fabrics especially the houndstooth!! I will make one more of these quilts but I am going to change the borders.
Sunday, March 24, 2013
What did We Learn From Pinterest Today?
I am taking a break from quilting and I saw this cute plastic Easter egg wreath on Pinterest. All items are from the dollar store.
4 bags of plastic Easter eggs
1 12" grapevine wreath
1 3 yd. reel of Easter themed wire ribbon
1package pink plastic glitter bows (or use the wire ribbon to create your own but buy one more reel)
glue gun and glue sticks
ribbon, cord, yarn, string etc. for hanging tie
The ribbon is wrapped around the grapevine wreath snuggly to help the eggs adhere to wreath. I began in the inner circle of the wreath and glued eggs around to fill in. The I started glueing egs to center and outside edges in a pleasing manner. This took a whole 5-10 minutes!! I saved some room for the pink plastic bow to fit at the bottom of the wreath. You could make a "fancy" wire ribbon bow instead if you wanted to. I used a piece of pink satin ribbon and looped it through the wreath on the top and tied a knot which I hid and ta-da I hung it on my door!! Back to quilting!!
There are plenty of Easter ideas on Pinterest and the dollar store provides lots of the materials at an inexpensive price. Have fun and don't burn yourself with the glue gun!!
Subscribe to:
Posts (Atom)